GeoDjango Loading a Shapefile into PostGIS
This post do following GeoDjango Tutorial. In this post we will loading a shapefile then convert it for import to PostGIS.
Geographic Data
Thailand - Administrative Boundaries
The Thai district boundaries (administrative level 2) data is available in this zip file.
- Create a data directory in the network_topology application
- Download the Thai district boundaries data
- unzip
$ mkdir network_topology/data
$ cd network_topology/data
$ wget https://data.humdata.org/dataset/d24bdc45-eb4c-4e3d-8b16-44db02667c27/resource/baecf366-00d9-425e-9ff5-e583d187374c/download/tha_adm2_gista_plyg_v5.zip
$ unzip tha_adm2_gista_plyg_v5.zip
$ cd ../..
Use ogrinfo to examine spatial data
GDAL ogrinfo : Lists information about an OGR supported data source.
$ ogrinfo data/tha_adm2_gista_plyg_v5/THA_Adm2_GISTA_plyg_v5.shp
INFO: Open of `data/tha_adm2_gista_plyg_v5/THA_Adm2_GISTA_plyg_v5.shp'
      using driver `ESRI Shapefile' successful.
1: THA_Adm2_GISTA_plyg_v5 (Polygon)
Use ogrinfo -so Summary Only (-so): supress listing of features, show only the summary information like projection, schema, feature count and extents.
$ ogrinfo -so data/tha_adm2_gista_plyg_v5/THA_Adm2_GISTA_plyg_v5.shp THA_Adm2_GISTA_plyg_v5
INFO: Open of `data/tha_adm2_gista_plyg_v5/THA_Adm2_GISTA_plyg_v5.shp'
      using driver `ESRI Shapefile' successful.

Layer name: THA_Adm2_GISTA_plyg_v5
Metadata:
  DBF_DATE_LAST_UPDATE=2017-08-16
Geometry: Polygon
Feature Count: 928
Extent: (97.343358, 5.613038) - (105.636965, 20.465074)
Layer SRS WKT:
GEOGCS["GCS_WGS_1984",
    DATUM["WGS_1984",
        SPHEROID["WGS_84",6378137.0,298.257223563]],
    PRIMEM["Greenwich",0.0],
    UNIT["Degree",0.0174532925199433],
    AUTHORITY["EPSG","4326"]]
PROV_NAMT: String (80.0)
Adm1Name: String (254.0)
Adm1Code: String (254.0)
AMP_NAMT: String (80.0)
Adm2Name: String (254.0)
Adm2Code: String (254.0)
Admin0Name: String (50.0)
Admin0Code: String (2.0)
Geographic Models
Try ogrinspect
Automate geographic models and import data process with use of the ogrinspect management command.
The ogrinspect command introspects a GDAL-supported vector data source (e.g., a shapefile) and generates a model definition and LayerMapping dictionary automatically. We will define the model class name as AdministrativeLevel2Boundaries in model.py.
$ python manage.py ogrinspect [options] <data_source> <model_name> [options]

$ python3 manage.py ogrinspect network_topology/data/THA_Adm2_GISTA_plyg_v5.shp AdministrativeLevel2Boundaries --srid=4326 --mapping --multi
The command produces the following output , which may be copied directly into the models.py
# This is an auto-generated Django model module created by ogrinspect.
from django.contrib.gis.db import models

class AdministrativeLevel2Boundaries(models.Model):
    prov_namt = models.CharField(max_length=80)
    adm1name = models.CharField(max_length=254)
    adm1code = models.CharField(max_length=254)
    amp_namt = models.CharField(max_length=80)
    adm2name = models.CharField(max_length=254)
    adm2code = models.CharField(max_length=254)
    admin0name = models.CharField(max_length=50)
    admin0code = models.CharField(max_length=2)
    geom = models.MultiPolygonField(srid=4326)


    # Auto-generated `LayerMapping` dictionary for AdministrativeLevel2Boundaries model
    administrativelevel2boundaries_mapping = {
    'prov_namt': 'PROV_NAMT',
    'adm1name': 'Adm1Name',
    'adm1code': 'Adm1Code',
    'amp_namt': 'AMP_NAMT',
    'adm2name': 'Adm2Name',
    'adm2code': 'Adm2Code',
    'admin0name': 'Admin0Name',
    'admin0code': 'Admin0Code',
    'geom': 'MULTIPOLYGON',
}
Defining a Geographic Model
Copied the output from the ogrinspect command to models.py in network_topology app.
Note that the models module is imported from django.contrib.gis.db.
We use a amp_namt field to returns the string representation of the model. The default spatial reference system for geometry fields is WGS84 (meaning the SRID is 4326).
from django.contrib.gis.db import models

# Create your models here.
class AdministrativeLevel2Boundaries(models.Model):
    prov_namt = models.CharField(max_length=80)     # provinc_name_th
    adm1name = models.CharField(max_length=254)     # provinc_name_en
    adm1code = models.CharField(max_length=254)     # province_code
    amp_namt = models.CharField(max_length=80)      # amphoe_name_th
    adm2name = models.CharField(max_length=254)     # amphoe_name_en
    adm2code = models.CharField(max_length=254)     # amphoe_code
    admin0name = models.CharField(max_length=50)    # country
    admin0code = models.CharField(max_length=2)     # contry_code
    # GeoDjango-specific: a geometry field (MultiPolygonField)
    geom = models.MultiPolygonField(srid=4326)

    # Returns the string representation of the model.
    def __str__(self):
        return self.amp_namt
Create a database migration
After defining your model, we need to sync it with the database.
- makemigrations : Creates new migrations based on the changes detected to your models.
$ python manage.py makemigrations Migrations for 'network_topology': network_topology/migrations/0001_initial.py - sqlmigrate : Prints the SQL statements for a migration
$ python manage.py sqlmigrate network_topology 0001 BEGIN; -- -- Create model AdministrativeLevel2Boundaries -- CREATE TABLE "network_topology_administrativelevel2boundaries" ( "id" serial NOT NULL PRIMARY KEY, "prov_namt" varchar(80) NOT NULL, "adm1name" varchar(254) NOT NULL, "adm1code" varchar(254) NOT NULL, "amp_namt" varchar(80) NOT NULL, "adm2name" varchar(254) NOT NULL, "adm2code" varchar(254) NOT NULL, "admin0name" varchar(50) NOT NULL, "admin0code" varchar(2) NOT NULL, "geom" geometry(MULTIPOLYGON,4326) NOT NULL); CREATE INDEX "network_topology_administrativelevel2boundaries_geom_id" ON "network_topology_administrativelevel2boundaries"USING GIST ("geom"); COMMIT; - migrate : Synchronizes the database state with the current set of models and migrations.
$ python manage.py migrate
Operations to perform:
Apply all migrations: admin, auth, contenttypes, network_topology, sessions
Running migrations:
Applying network_topology.0001_initial... OK
Show Tables in the Database.
postgres=# \c gisdb
gisdb=# \dt
                              List of relations
 Schema  |                      Name                       | Type  |  Owner
---------+-------------------------------------------------+-------+----------
 postgis | spatial_ref_sys                                 | table | postgres
...
 public  | auth_user                                       | table | ubuntu
 public  | auth_user_groups                                | table | ubuntu
 public  | auth_user_user_permissions                      | table | ubuntu
 public  | django_admin_log                                | table | ubuntu
 public  | django_content_type                             | table | ubuntu
 public  | django_migrations                               | table | ubuntu
 public  | django_session                                  | table | ubuntu
 public  | network_topology_administrativelevel2boundaries | table | ubuntu
...

gisdb=# \d network_topology_administrativelevel2boundaries
Table "public.network_topology_administrativelevel2boundaries"
Column   |            Type             | Collation | Nullable |                                   Default
...
id         | integer                     |           | not null | nextval('network_topology_administrativelevel2boundaries_id_seq'::regclass)
prov_namt  | character varying(80)       |           | not null |
adm1name   | character varying(254)      |           | not null |
...
admin0name | character varying(50)       |           | not null |
admin0code | character varying(2)        |           | not null |
geom       | geometry(MultiPolygon,4326) |           | not null |
Indexes:
"network_topology_administrativelevel2boundaries_pkey" PRIMARY KEY, btree (id)
"network_topology_administrativelevel2boundaries_geom_id" gist (geom)
Importing Spatial Data
LayerMapping
The LayerMapping class provides a way to map the contents of vector spatial data files (e.g. shapefiles) into GeoDjango models.
class LayerMapping(model, data_source, mapping,
  layer=0, source_srs=None, encoding=None,
  transaction_mode='commit_on_success', transform=True,
  unique=True, using='default')
To import the data, use a LayerMapping in a Python script. Create a file called load.py inside the network_topology application, with the following code:
import os
from django.contrib.gis.utils import LayerMapping
from .models import AdministrativeLevel2Boundaries

# Each key in the administrativelevel2boundaries_mapping dictionary corresponds to
# a field in the AdministrativeLevel2Boundaries model.
administrativelevel2boundaries_mapping = {
    'prov_namt': 'PROV_NAMT',
    'adm1name': 'Adm1Name',
    'adm1code': 'Adm1Code',
    'amp_namt': 'AMP_NAMT',
    'adm2name': 'Adm2Name',
    'adm2code': 'Adm2Code',
    'admin0name': 'Admin0Name',
    'admin0code': 'Admin0Code',
    'geom': 'MULTIPOLYGON',
}

tha_adm2_shp = os.path.abspath(
    os.path.join(os.path.dirname(__file__), 'data', 'THA_Adm2_GISTA_plyg_v5.shp'),
)

def run(verbose=True):
    lm = LayerMapping(
        AdministrativeLevel2Boundaries, tha_adm2_shp, administrativelevel2boundaries_mapping,
        transform=False, encoding='utf-8',
    )
    lm.save(strict=True, verbose=verbose)
- administrativelevel2boundaries_mapping : copy from output of
ogrinspectcommand above - tha_adm2_shp : path to our shapefile (
THA_Adm2_GISTA_plyg_v5.shp) in data directory
Import the Spatial Data into GeoDjango models
Invoke the Django shell from the kapany project directory:
$ python manage.py shell
Next, import the load.py , call the run routine, and watch LayerMapping do the work:
>>> from network_topology import load
>>> load.run()
Queries the imported data in PostGIS database
gisdb=# select id, prov_namt, amp_namt from network_topology_administrativelevel2boundaries limit 5;
 id | prov_namt |  amp_namt
----+-----------+-------------
  1 | เชียงใหม่   | เชียงดาว
  2 | เชียงใหม่   | เมืองเชียงใหม่
  3 | เชียงใหม่   | เวียงแหง
  4 | เชียงใหม่   | แม่แจ่ม
  5 | เชียงใหม่   | แม่แตง
(5 rows)

gisdb=# select count(*) from network_topology_administrativelevel2boundaries;
 count
-------
   928
(1 row)
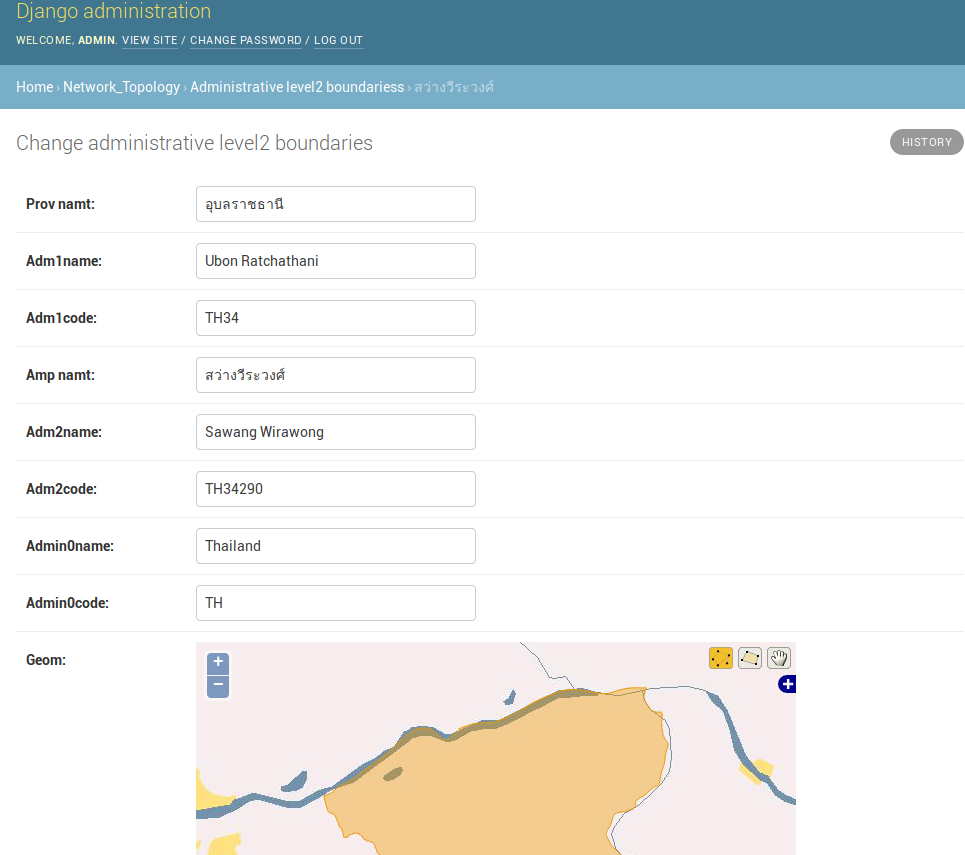
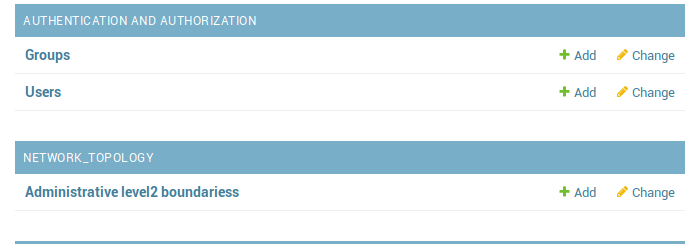
Putting Data on the Map
Geographic Admin
Create a file called admin.py inside the network_topology application with the following code:
from django.contrib.gis import admin

# Register your models here.

from .models import AdministrativeLevel2Boundaries

admin.site.register(AdministrativeLevel2Boundaries, admin.GeoModelAdmin)
Next, edit your urls.py in the kapany application folder as follows:
from django.contrib.gis import admin
from django.urls import include, path

urlpatterns = [
    path('admin/', admin.site.urls),
]
Next, start up the Django development server:
$ python manage.py runserver 0:8000
Performing system checks...

System check identified no issues (0 silenced).
June 27, 2018 - 02:28:14
Django version 2.0.6, using settings 'kapany.settings'
Starting development server at http://0:8000/
Quit the server with CONTROL-C.
Finally, browse to http://127.0.0.1:8000/admin/, and log in with the user you just created.

Browse to any of the Administrative level2 boundariess entries.