Install Chatwoot with SSL Termination
Chatwoot gives you all the tools to manage conversations, build relationships and delight your customers from one place. This guide will help you to install Chatwoot on Ubuntu 20.04 LTS.
Steps to install
-
Download setup script
$ wget https://get.chatwoot.app/linux/install.sh --2023-06-14 09:30:42-- https://get.chatwoot.app/linux/install.sh Resolving get.chatwoot.app (get.chatwoot.app)... 65.9.181.31, 65.9.181.128, 65.9.181.34, ... ... # change mode to executable $ chmod +x install.sh -
Execute the install script.
$ sudo ./install.sh --install ... Chatwoot Installation (v2.17.1) ... For more verbose logs, open up a second terminal and follow along using, 'tail -f /var/log/chatwoot-setup.log'. Would you like to configure a domain and SSL for Chatwoot?(yes or no): no Would you like to install Postgres and Redis? (Answer no if you plan to use external services): ➥ 1/9 Installing dependencies. This takes a while. ➥ 2/9 Installing databases. ➥ 3/9 Skipping webserver installation. ➥ 4/9 Setting up Ruby ➥ 5/9 Setting up the database. ➥ 6/9 Installing Chatwoot. This takes a long while.- Open a new terminal for see log install with command
tail -f /var/log/chatwoot-setup.log
- Open a new terminal for see log install with command
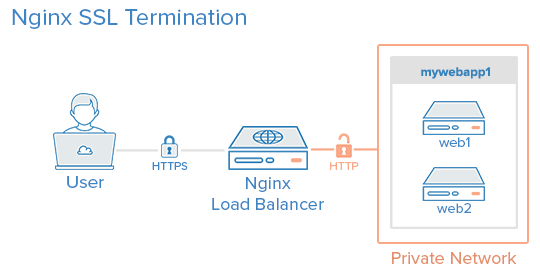
Figure 1: SSL termination proxy (DigitalOcean Tutorial 2014)
-
Install Nginx
# install $ sudo apt install nginx -y # show version $ nginx -v nginx version: nginx/1.18.0 (Ubuntu) $ openssl version OpenSSL 3.0.2 15 Mar 2022 (Library: OpenSSL 3.0.2 15 Mar 2022) # create a strong Diffie-Hellman (DH) group $ sudo openssl dhparam -out /etc/nginx/dhparam.pem 4096 - Creating a Configuration Snippet Pointing to the SSL Key and Certificate
$ sudo nano /etc/nginx/snippets/self-signed.confWithin this file will look like the following:
ssl_certificate /etc/ssl/certs/ssl-cert-snakeoil.pem; ssl_certificate_key /etc/ssl/private/ssl-cert-snakeoil.key; -
Creating a Configuration Snippet with Strong Encryption Settings
$ sudo nano /etc/nginx/snippets/ssl-params.confWithin this file will look like the following:
ssl_protocols TLSv1.3; ssl_prefer_server_ciphers on; ssl_dhparam /etc/nginx/dhparam.pem; ssl_ciphers EECDH+CHACHA20:EECDH+AES128:RSA+AES128:EECDH+AES256:RSA+AES256:EECDH+3DES:RSA+3DES:!MD5; ssl_ecdh_curve secp384r1; ssl_session_timeout 1d; ssl_session_cache shared:SSL:10m; ssl_session_tickets off; ssl_stapling on; ssl_stapling_verify on; # Enable TLSv1.3's 0-RTT. Use $ssl_early_data when reverse proxying to # prevent replay attacks. # # @see: https://nginx.org/en/docs/http/ngx_http_ssl_module.html#ssl_early_data ssl_early_data on; resolver 8.8.8.8 8.8.4.4 valid=300s; resolver_timeout 5s; # Disable strict transport security for now. You can uncomment the following # line if you understand the implications. # add_header Strict-Transport-Security "max-age=63072000; includeSubDomains; preload"; # add_header X-Frame-Options DENY; add_header X-Content-Type-Options nosniff; add_header X-XSS-Protection "1; mode=block"; - Adjusting the Nginx Configuration to Use SSL
$ sudo nano /etc/nginx/sites-available/defaultConfiguring HTTP/2 Support Within this file will look like the following:
map $http_upgrade $connection_upgrade {
 default upgrade;
 ''      close;
}
# Create a new top-level upstream directive and add your backend server instances to it

upstream backend_chatwoot {
server IP_ADDRESS_1:3000;
#server IP_ADDRESS_2:3000;
#server IP_ADDRESS_3:3000;

# Limiting the number of idle keepalive connections
# stored in each worker process cache
keepalive 32;
}

# Default server configuration
#
server {
      #listen 80 default_server;
      #listen [::]:80 default_server;

      # SSL configuration
      #
      listen 443 ssl http2 default_server;
      listen [::]:443 ssl http2 default_server;
      #
      # Note: You should disable gzip for SSL traffic.
      # See: https://bugs.debian.org/773332
      #
      # Read up on ssl_ciphers to ensure a secure configuration.
      # See: https://bugs.debian.org/765782
      #
      # Self signed certs generated by the ssl-cert package
      # Don't use them in a production server!

      #
      # include snippets/snakeoil.conf;

      include snippets/self-signed.conf;
      include snippets/ssl-params.conf;

      root /var/www/html;

      # Add index.php to the list if you are using PHP
      index index.html index.htm index.nginx-debian.html;

      server_name LOAD_BALANCER_IP;

      location / {
               # First attempt to serve request as file, then
               # as directory, then fall back to displaying a 404.
               # try_files $uri $uri/ =404;

               #
               proxy_pass http://backend_chatwoot;

               #recommended Nginx header forwarding settings
               include proxy_params;


               # Intercept Link header and initiate requested Pushes
               http2_push_preload on;

               proxy_set_header Upgrade $http_upgrade;
               proxy_set_header Connection $connection_upgrade;


      }
}